28-Days-to-Lean Meal Plan
With the right plan and the right discipline, you can get seriously shredded in just 28 days.
Read article
Still looking for that elusive “magical” exercise? You know, the one move that holds the key to building maximum muscle? As a beginner you probably spent time scouring muscle magazines and querying longtime gym rats, only to find a tremendous difference of opinion as to what works best.
But if you were to ask champion bodybuilders and the world’s top strength coaches, they’d agree that the deadlift is, in fact, among the top exercises you can do to pack on size. In terms of adding quality mass, it’s the one move you can’t afford not to do.
Texas pro Johnnie Jackson, winner of the 2006 Montreal Pro Classic and 2007 Atlantic City Pro and considered one of the sport’s strongest men, credits the deadlift as the definitive key to his densely muscled physique.
“I gained the bulk of my size when I trained like a powerlifter,” says Johnnie, who deadlifted more than 770 pounds before he became a pro bodybuilder. “I developed so much thickness in my back, legs, and even my chest and shoulders through deadlifting. It’s a total-body exercise.
Take a deep breath and hold it as you start the pull off the floor. This increases torso stability by bracing the spine and helps generate greater strength of the muscles involved when you’re lifting heavy.
Keep the bar close to your body (actually touching) throughout the range of motion. “You never want the bar to be off your body,” IFBB pro Johnnie Jackson says.
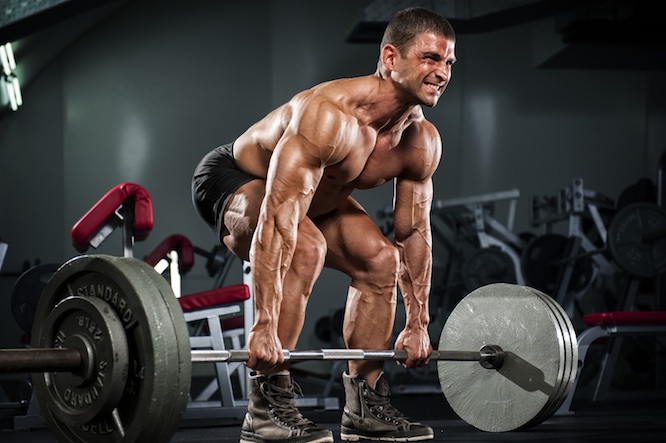
Pull the weight off the floor by straightening your legs, keeping your back flat and the bar close to your body with your arms straight. Your shoulders and hips must come up at the same relative speed; don’t let your hips “kick up” before your shoulders move. “People will commonly start rising up with their hips first instead of extending their hips, knees and trunk simultaneously,” says David Sandler, CSCS, owner of StrengthPro, Inc. and consultant on National Geographic Channel’s Super Strength. Think about pushing through the floor with your feet as you drive to stand upright.

If you feel you’re losing your form as you execute the move, just drop the bar—don’t try to complete a rep, especially with heavy weight, if you’re in a compromised body position.
Once you get the bar over your knees, maintain a straight back. As your legs approach full extension, squeeze your glutes to drive your hips forward and raise your torso back and up to the erect position. Concentrate on pulling with your hip muscles, not your arms, when raising your torso.
Keep the pull explosive as you ascend in a smooth motion, accelerating out of the bottom position while keeping the bar under control. When first learning the exercise, move very deliberately to master the technique. As you become more experienced, Johnnie recommends using a forceful speed even on your practice sets to condition your body to do so automatically on the heavier ones.

Breathe out forcefully as you reach the top of the lift.
Stand erect in the fully upright position with your legs straight and knees unlocked, but don’t lean back at the top of the lift. Keep your chest out and shoulders back, holding the arch in your lower back. Take 1 to 3 deep breaths and hold your breath as you descend back down.
Keep your ankles, knees and hips aligned at all times to ensure an ideal line of force and reduce stress on the knees and hips.

Lower the bar under control by bending your hips and knees. Push your hips back and, as you bend your knees and maintain normal spinal curvature, incline your torso forward about 45 degrees. The exact degree of forward inclination is determined by your ability to hold the natural arch in your lower back.
Keep your weight centered over your feet. If your head is down, it can pull your body forward and your heels will come off the floor, which disengages a lot of the working muscles, Johnnie says. Keep your bodyweight centered over your feet at all times.
Don’t bounce the bar off the floor at the end of the lift. Stop at the bottom as the plates touch the floor, then go right into the next rep from a dead stop.

Here are a few extra tips to help you get the most out of this exercise.
Do a 5 to 10-minute cardio warm-up plus some simple exercises to get blood flowing through the muscles, joints and connective tissue of the upper and lower body. When going heavy, include several lighter sets not taken to failure.
For all but your heaviest sets, rely on the strength of your torso muscles instead of a lifting belt. Wearing a belt takes some stress off the lower back while increasing the workload on the abs, but it won’t improve your overall torso strength.
If your grip is giving out even though your legs and back can handle the weight, use chalk or straps to assist in the lift. Otherwise go raw.
Load the barbell on the floor with collars snug so the plates won’t roll off. Clear the area of loose plates and other equipment.
If you’re new to the lift, have someone with knowledge of deadlifting watch your form to provide feedback on your technique.